Hellooooooo
I am feeling super cheery today and I have made a happy but tiny little book for this month challenge on The Artistic Stampers blog, please pop over and take a look at my teamie's creations and join in this fun challenge for your chance to win one of Jennie great stamps.
What I did 😆
1- Cut card to required page size, fold in half and round the corners (or be super lazy like me and use the card notelets you have in your stash)
2- Cut pieces of card for the front, back, and spine of the book. The front and back should be slightly longer and wider than the page size. The spine should be the same length as the covers and slightly wider than all the pages when they are together.
3- Cover all the pages with a layer of Gesso.
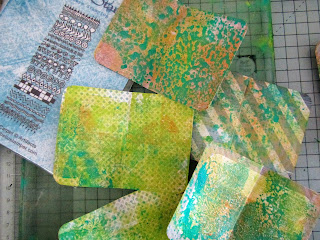
4- Create layers of paint on top of your pages, I spread a dark green and bronze acrylic paint over my Gelli press plate and then pressed all the pages into the paint, without applying any extra paint this gave me lots of variation in my first layer.
5- For my second layer I spread lighter green paint onto my Gel press plate, this paint was far more fluid than the previous paint used and started to bead and pool on the plate, I then stamped into the paint with the magic carpet stamp for extra interest before pressing all the pages onto the plate. this time I only transferred paint to some sections of the pages.
6- I repeated step 5 with white acrylic paint and that soon to be released, and most likely my new favorite stamp, stamp.
7- Add extra interest by applying Distress Ink through the Harlequin mask coming in from the edges of the pages.
8- Taking a brown Ink, stamp in a few places on each page using the treasured memorise stamp and edge each page.
9- Glue each page back to back with the next, checking all the text is facing the correct way.
10- Cut a piece of card that will fit and wrap all of your cover sections and decorate it the same way as your pages, I used the mop-up card from my Gel press plate.
11- Glue the sections to the decorated card, cut the decorated card so there is a 1.5 cm boarder and snip the corners away.
12- Score (this makes folding easy), fold and glue the decorated card to wrap the panels.
13- Glue the pages into the cover. Apply glue to the back of the first page and line it up to the cover so that the score line on the page is lined up with the space between the cover and the spine.
14- Turn the book and do the same gluing the back of the first page to the front cover.
Amazing if you have made it this far, lots of instructions that I hope make sense.
Thanks for reading
Gemma
and of course, the stamp that's coming soon


Absolutely gorgeous, love all the prints and the green is fabulous ❤️❤️
ReplyDeleteThank you Tracy, I do love green xxx
DeleteIt’s lovely
ReplyDeleteThank you Clare x
DeleteThis is awesome
ReplyDeleteThank you Katie x
DeleteWow, what an super mini book! The backgrounds you created are amazing 😁. Thanks for the inspiration and wishing you a happy weekend! J 😊
ReplyDeleteThank you Let's Art Journal, I gave this book away and now I am itching to make a new one so I have one to keep.
Delete